

How to Clean makeup brushes?- Step by Step- Introduction
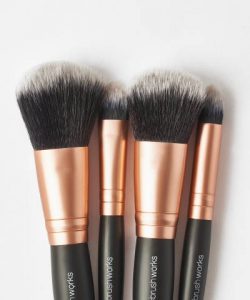
Want to know how to clean makeup brushes? We all love makeup, don’t we? Makeup brushes are an essential part of your vanity. We pain, contour, bake, and do what not with them. But, we most often forget to clean them. Cleaning makeup brushes are on every girl’s to-do list, but we rarely do it.
We pick up yesterday’s foundation brush and start buffing powder with it and reuse it for today’s makeup again. Likewise, contour brushes, highlighting meetings, concealer brushes are ignored too.
“As makeup and oils build up on brushes and sponges, they create a breeding ground for bacteria and other microorganisms, which can cause breakouts, styes, staph, or even herpes outbreaks,” board-certified dermatologist Hadley King, M.D stated.
Using dirty makeup brushes and sponges can lead to not only skin irritation but also potential infections.
There are various methods to clean makeup brushes. Let’s decode how to clean makeup brushes- step by step.
How often Should you clean your makeup brushes?
Generally speaking, you’ll want to clean your brushes at least once a month. Stretching out the time, any further puts you at risk of nasty side effects. Fortunately, it only takes you a few minutes to wash your brushes, and then you’ll be good to go for another month.
When it comes to foundation and blush brushes, once a month is a comfortable standard, in the case of brushes used around your eyes for shadow and liner, you’ll probably want to clean them more often.
The more often you change makeup colors, the more often you’ll need to clean your brushes. You are putting off cleaning leaves all of your favorite shades looking muddy. Ideally, to keep cosmetics colors looking fresh, you’ll want to clean your brushes after every use.
PRO TIP: Never, ever share your makeup brushes. Spreading your oil and germs is nasty. Wiping someone else’s gunk all over your face can lead to severe skin problems like acne, breakouts, etc. The best way is to use your makeup tools.
- Foundation and powder brushes: Once a week
- Eye makeup and concealer brushes: Bi-weekly
- Other meetings: Once a month
What Should you use to clean your makeup brushes?
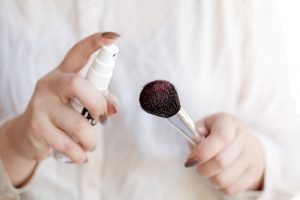
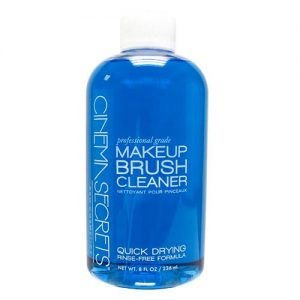
There are lots of makeup-brush cleaners out there, from brands like Sephora, which come in a spray form that can help you freshen up your makeup brushes when you’re in a hurry or getting late for work.
Or you can opt for a liquid brush cleaner, which can be a lifesaver when you’re working on a strict schedule and quickly need to touchup your makeup or make it lighter/deeper as per the requirement. Most of the makeup artists use liquid cleaner all the globe.
Lots of makeup lovers, and even the pros, look to everyday dish soaps and hand soaps to deep-clean their brushes; they’re gentle enough to use on makeup brushes and contain the ingredients to break down oils and powders.
Certain types of cleansers can be more effective at removing certain makeup products. Deep-cleaning with bar soap is ideal for removing creamier products, such as concealers, lipsticks, and foundations, from synthetic brushes and Beautyblenders.
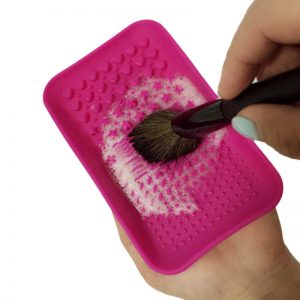
During the cleansing process, using textured cleaning mitts and mats can help break up even the most budge-proof makeup residue. They’re extra efficient since they’re often divided into sections with varying textures. These are designed to break up pigment on all your different tools.
Mats also usually have suction cups on the back to prevent them from slipping and sliding in your sink.
Another way to clean your makeup brushes without having to spend a lot is by using essential kitchen ingredients. Using Olive oil may help. The dish soap cleans and disinfects your meeting, while the olive oil seals in moisture and smooths the brush hair.
Mix the Olive oil with either your shampoo or conditioner and prepare a mixture. Now, dip the brushes into the mixture and leave them. The brushes will be just as clean and silky as they were when you first purchased them.
This soapy, olive oil mixture works well to clean any brush from any makeup brand! It doesn’t matter if it’s a face or eye brush – it tends them all! It also doesn’t matter where you purchased the brush- use this mixture to clean all of your brushes, from Mac to Sigma to ELF.
Also, using this method, your brushes will not get misshapen or lose bristles! As your brushes dry, they will take their original shape- not the semi-deformed one that they temporarily have due to their wet strands. And as long as you rinse your brushes well under cold water and pat the handle dry before setting it down to dry, the bristles will not fall out!
How to clean your makeup brushes? – The Right Way!
There are various methods to clean your makeup brushes.
The best ways are:
-
Using Soap and Water
- Hold your brushes upside-down under the water, so water doesn’t get inside the metal clasp of the handle and ruin the glue that holds the bristles together. Keep running the water through the bristles until you’ve rinsed away most of the old makeup. Make sure the bristles are angled downward into the stream of water. If water gets under the metal clasp of the handle, it may damage the bristles.
- Don’t use hot water, as the heat may damage the bristles.
- Move and separate the bristles as you wash the brushes so that the water gets down into the center of the brush.
- Fill a small bowl or cup with some water, if you prefer to dip the brush. You will need ¼ cup of lukewarm water. Avoid using hot water, as it may damage the bristles.
- You can also apply the soap directly to the brush. This is especially helpful if the brush is very soiled.
-
Pour some baby shampoo to the water if you’re using a bath.
Add one teaspoon of baby shampoo into the cup and still gently to combine.
- If you do not have baby shampoo, use liquid Castile soap instead.
- Dip the brush into the mixture and swirl. Only the bottom half of your brushes’ bristles should be swirled in the mix to avoid water traveling up the handle.
- If you are not using a bowl, you can work the soap into the bristles using your fingers.
- Remove the brush from the mixture, if you used one. Loosen up the makeup and dirt by gently massaging the soapy water into the bristles with your fingers.
- Rinse the bristles under lukewarm water. Continue to massage the bristles while running them under the water until it runs apparent. Avoid getting the handle wet.
- You may need to wash and rinse the brush several times to get it clean. If the rinse water looks very cloudy, then rewash the brush.
- The brush isn’t completely clean until the water that passes through the bristles comes out clean.
- Pat the bristles dry. Use a towel to remove some of the moisture gently. Fold it around the wet bristles and gently squeeze it with your fingers.
- Reshape the bristles. If the bristles became crooked, you would need to reshape them. Use your fingers to straighten, spread, pull the bristles back into their original shape.
- Let the brushes dry. Do not lay them on a towel—this can cause mildew. Instead, set the brush down on a counter, with the bristle part hanging over the edge.
-
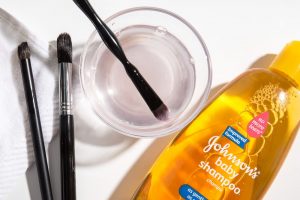
Image credit: siellabeauty.com -
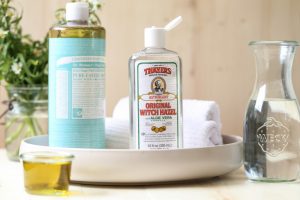
Removing oil-based makeup
- Combine all of the ingredients in a container. Add ½ cup (118 ml) of witch hazel, 2 teaspoons (10 ml) of liquid baby soap, 1 cup (237 ml) of distilled water, and 1 teaspoon (5 ml) of nourishing oil, such as olive, jojoba, or almond, in a mason jar or other container. Put a lid on the container, and shake it well to mix all of the ingredients thoroughly.
- The witch hazel in the cleaner is antibacterial, so it kills any germs on your brushes. The baby soap removes makeup residue and other dirt. The oil also helps break down makeup and helps condition the brushes too.
- Because the oil may separate from the other ingredients, always shake the cleaner before using it.
Dip the brushes into the cleaner and allow them to soak.
When you’re ready to clean your brushes, pour some of the cleaners into a small bowl or cup. Place the brushes in the cleaner, and let them soak for 5 to 10 minutes.
- If you prefer, you can put the cleaner in a spray bottle, spray some on the brushes, and then rub the bristles over a towel.
Rinse the brushes and let them dry. After the brushes have soaked for several minutes, remove them from the cleaner. Run them under lukewarm water in the sink to rinse them, and carefully shape the wet bristles with your fingers. Set the brushes out on a counter or table to air dry.
- Be sure not to dry the brushes with the bristles up in the air. Water can drip back into the brushes’ ferrule, which can cause bristles to fall out.
-
Deep cleaning
- Pour the alcohol into a spray bottle. Add 5 ounces (148 ml) of isopropyl alcohol to a clean plastic or glass spray bottle. Make sure that there is enough room at the top of the bottle to mix in the water and oil.
- For the best results, use 70% isopropyl alcohol in the brush cleaner spray. The alcohol doesn’t just serve as a disinfectant for the brushes; it also helps the cleaner dry more quickly so you can spot clean your brushes and use them right away.
- Your spray bottle should hold at least 8 ounces (237 ml).
-
Add the water and oil.
With the alcohol in the spray bottle, pour in 2 ounces (59 ml) of distilled water and 10 to 15 drops of your favorite essential oil. Shake the bottle well to ensure that all of the ingredients are thoroughly mixed.
- The essential oil is meant to cover the alcohol scent of the cleaner, so you can use whichever fragrance you prefer. However, you may want to use an oil with antibacterial properties, such as eucalyptus, peppermint, lavender, or tea tree oil.
- Because the oil may separate from the other ingredients, always shake the spray well before using it.
-
Spray the brushes with the cleaner and rub on a towel.
-
To use the cleaner, lightly spray the bristles of the brushes. Run the brushes back and forth over a towel or piece of paper towel. Allow the brush to air dry for a minute or two, and then use the brush as you usually would.
- Feel the brushes’ bristles before using them after cleaning to make sure that the cleaner has dried completely.
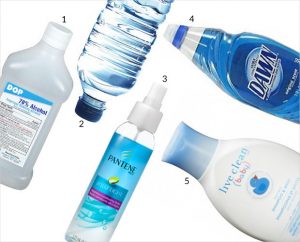
image credit: saubhayamakeup.com
How often should you replace them?
Regular makeup sponges (the inexpensive kind that come in bulk bag) aren’t meant to be reused — toss those after a single-use. Microbial-resistant sponges like Beautyblenders, on the other hand, are intended to be reused and can be safely used for three to four months. As with makeup brushes, make sure to clean your BeautyBlenders at least once a week, as the sponges can become filled with skin cells, and bacteria can overgrow.
When should you throw them off?
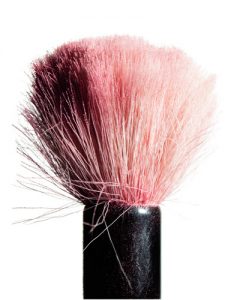
Although frequent cleansing can help extend the life of your brushes, there are signs you shouldn’t ignore when it comes to determining that they’re no longer capable of doing the best job possible.
It’s time to toss your makeup brush when the bristles start to fray, shed, or lose their shape. The right tools are as necessary for getting the look you want as the actual makeup itself. If your brushes become too pinched or squashed, then they will not be up to the job.
Epilogue
Cleaning makeup brushes can be messy for people who think it is. But it can genuinely hassle-free for others who make a habit of the cleansing regime. Keeping your brushes squeaky clean will not only help you keep your skin healthy but also make your makeup look flawless.
For more such beauty banters. Stay tuned!


